
| Version 7 (modified by gengen, 12 years ago) (diff) |
|---|
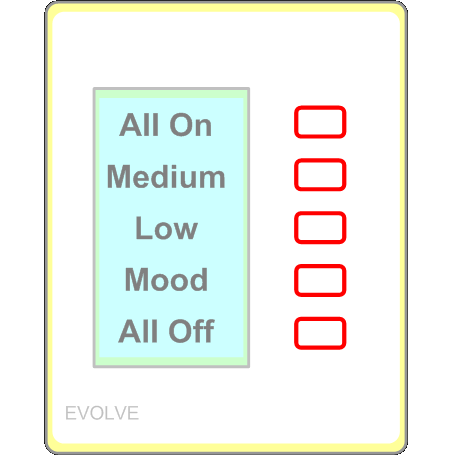
Evolve LCD1 Controller

This is a Vera plug-in for the Evolve Guest Controls LCD1 controller.
The product page for this device is here.
It should also work with the LCD-1 Tabletop model (LCD-1TT) as well as the dual-gang LCD1/Switch (LCD-2) but probably not with the LCD-3 or LCD-D.
Before this plug-in, you cold install an Evolve LCD1 into Vera just like any other Z-Wave device and it works as a generic 5-button scene controller. However, you could not modify the LCD screen or take advantage of other advanced features.
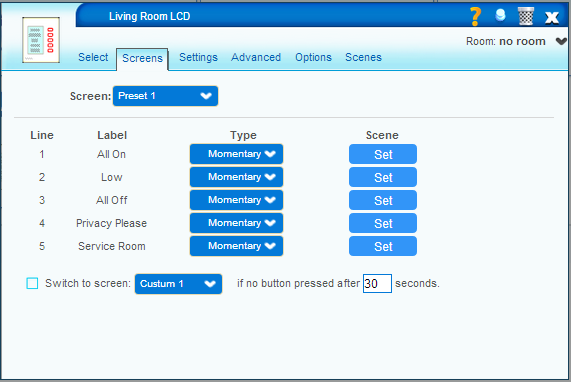
This plug-in not only allows you to set the LCD labels but also allows you to change screens. The scenes triggered when you press a button depends on the current screen.
This is an early pre-release version which I wanted to release for comments. Not all planned features are yet implemented.
Currently working features
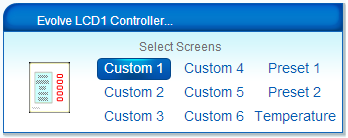
- Switch between 9 different screens from the Vera dashboard
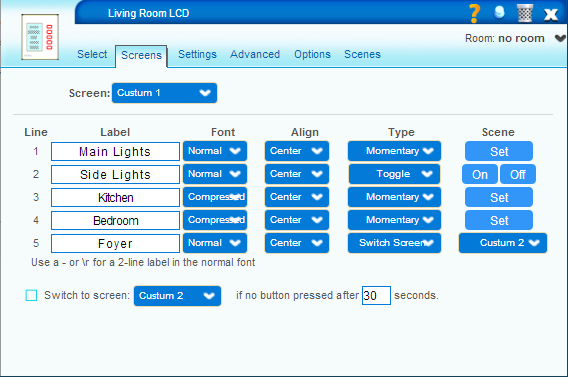
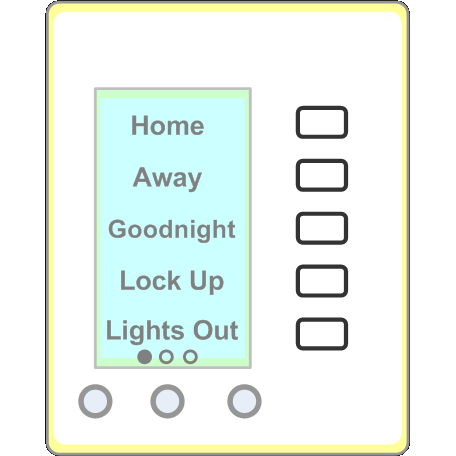
- Select labels for 6 different custom screens. Each screen can have 5 labels and each label can have 1 or 2 lines of text.
- Each screen can trigger 5 different scenes. Toggle mode buttons have separate activate and deactivate scenes.
- Detailed configuration options predefined in the Device Option tab.
Known bugs / unimplemented features
- Currently, there is no way to set the five button modes (momentary, toggle etc.) independently for each screen
- Sometimes, the current labels are not displayed in the C1-C6 tabs. If this occurs, click the reload button on your browser.
- There may be some reliability issues where labels are sometimes not displayed correctly when you switch screens, or else the device reboots and briefly shows its splash screen momentarily.
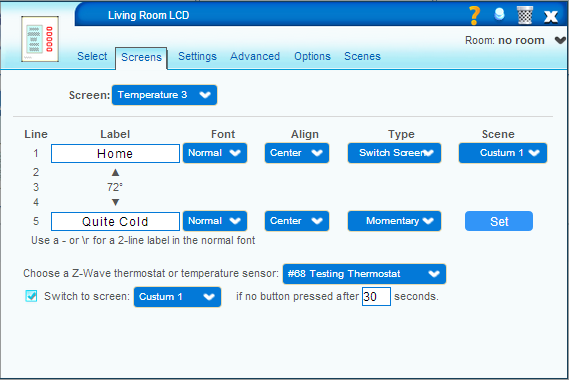
- Temperature/thermostat integration is still not fully baked, but you can get an idea of what is possible.
Installation
If you have previously included your Evolve LCD1 controller into your Z-Wave network, exclude it first.
Now install the app from the Mios Marketplace as you would any other plug-in. However, once installed, it will not automatically generate an icon.
Now include the LCD1 controller like any other Z-Wave device. Note that the inclusion process may take a little longer than usual. You may first see a generic scene controller icon. Then it will disappear, and it will then be replaced with the Evolve LCD1 icon.
Note: that this plug-in installs a global file: zwave_products_user.xml in vera's /etc/cmh directory. This file did not exist until this plug-in. This file can be used to add important extra information to specific Z-Wave devices. The current version contains entries for the Evolve LCD1 controller as well as the Evolve T100-R thermostat. Future versions could add information, such as detailed configuration parameters, for more Z-Wave devices. Unfortunately, there can only be one of these files and any plug-in which updates this file would overwrite any previous version.

Clicking on the wrench icon, you will see various tabs. The most important are named "C1" through "C6" and they control the labels in up to 6 custom screens. When the device is first created, these labels are filled in with numbers from One to Thirty spelled out, but you can change them to whatever you want.
Note: In the current version, you must type all of the 5 labels in a screen into the appropriate edit boxes before pressing the "Update" button even if some labels will not change.
You may also want to apply the patch described here to avoid a Vera UI5 bug related to displaying tabs with labels.
Connecting scenes
For now, you create scenes the same way as you usually do for other Vera scene controllers. Create a scene from the automation tab and assign it a trigger from the Evolve LCD1 Controller, not a device called "Evolve LCD1 Z-Wave". Each screen has its own set of 5 scene numbers triggered by the five buttons from top to bottom:
- Custom 1: Scenes 1-5
- Custom 2: Scenes 6-10
- Custom 3: Scenes 11-15
- Custom 4: Scenes 16-20
- Custom 5: Scenes 21-25
- Custom 6: Scenes 26-30
- Preset 1: Scenes 31-35
- Preset 2: Scenes 36-40
- Temperature: Scene 41 for the top button and scene 45 for the bottom button.
The Evolve LCD1 can itself be part of a scene to change the screen as part of another scene. For example, you can have one set of controls in the morning and a different screen in the evening by using a pair of time-based scenes to switch the screen twice per day.
How it works
This is a hybrid Vera device. Most devices in Vera are either Z-Wave or Lua devices. The Evolve LCD1 is both. In order to do this, two devices are created: The "Z-Wave device" and the "Peer device" but only the peer device is displayed in the main UI5 devices page or on the dashboard. (This is different from the typical parent-child relationship in other plug-in devices.) This dual-device strategy works around a limitation in the Vera architecture whereby Z-Wave devices cannot execute Lua commands. It also allows us to dispatch different scenes depending on what screen mode the device is in.
Sending screen updates to the LCD too quickly can cause lines of test to be lost, garbled, or placed in the wrong spot. Unfortunately, the delay required to avoid such errors is variable and choosing the maximum "safe" delay would cause screen redraws to be very slow. Furythermore, the device, does not give any feedback as to when it is safe to draw the next part of the screen. To solve this problem starting in version 0.7, the plug-in sends a dummy request to the controller. The controller will not respond if it is not yet ready and the plug-in will retry drawing that chunk with a bit more delay. Unfortunately, the only requests that pass through the Z-Wave chip on the device and onto the display microcontroller are not understood by Vera, and the current Vera firmware has no good method to pass such unknown messages to Lua code. Instead, the plug-in enables Z-Wave data received messages (log level 42) if they are not already enabled, and monitors the log for the expected response. This is an incredible hack but it is the only thing that works after many failed attempts at a more elegant solution.
Tuning Parameters
In the Advanced tab, you will find various tuning parameters which may be used to improve performance. The values of these parameters may depend on how far your LCD controller is away from Vera as well as the firmware version of the controller. When you first create the device one of two sets of parameters is chosen depending on whether the firmware version is greater than 0.31 or not. This plug-in was developed mostly with firmware version 0.37. All delay parameters are in milliseconds
| Parameter | Meaning | 0.31 default | 0.37 default |
|---|---|---|---|
| LCD_BaseDelay | Delay after redrawing any chunk of the screen | 2000 | 100 |
| LCD_ClearDelay | Delay after clearing the screen | 0 | 500 |
| LCD_LineDelay | Delay after redrawing each line of the screen | 0 | 100 |
| LCD_CharDelay | Delay after redrawing each character of the screen | 0 | 10 |
| LCD_ResponseDelay | Time needed to wait for a response after displaying a chunk | 30 | 30 |
| LCD_BackoffDelay | Delay to add after each failed attempt to draw a chunk | 50 | 50 |
| LCD_MaxParts | Maximum secions to draw in one chunk. Can be 1 or 2 | 1 | 2 |
| LCD_UseClearScreen | 1 to clear the whole scree, 0 to clear individual lines | 1 | 1 |
| LCD_Retries | maximum number of retries if redraw fails | 10 | 10 |
| ShowSingleDevice? | 0 to show both the Z-Wave and peer devices in UI5 | 1 | 1 |
Enjoy!
Gengen
Attachments
-
EvolveLCD_80x80.png
(1.6 KB) -
added by gengen 12 years ago.
EvolveLCD_80x80.png
-
EvolveLCD1_big.png
(15.9 KB) -
added by gengen 12 years ago.
EvolveLCD1_big.png
- EvolveLCD1_Tile.png (9.9 KB) - added by gengen 12 years ago.
-
EVLCDx Z-Wave Specification Rev H.pdf
(395.0 KB) -
added by gengen 12 years ago.
Evolve LCD1 Specification.pdf
-
Constom_Screen.png
(29.4 KB) -
added by gengen 11 years ago.
Custom screen example
-
Temperature_Screen.png
(32.6 KB) -
added by gengen 11 years ago.
Temperature screen example
-
Preset_Screen.png
(31.4 KB) -
added by gengen 11 years ago.
Preset Screen example
- CooperRFWC5_48x48.png (932 bytes) - added by gengen 5 years ago.
- CooperRFWC5_50x50.png (968 bytes) - added by gengen 5 years ago.
- CooperRFWC5_80x80.png (1.4 KB) - added by gengen 5 years ago.
- CooperRFWC5_big.png (12.3 KB) - added by gengen 5 years ago.
- EvolveLCD1_48x48.png (818 bytes) - added by gengen 5 years ago.
- EvolveLCD1_50x50.png (834 bytes) - added by gengen 5 years ago.
- HomeSeerFC200_48x48.png (833 bytes) - added by gengen 5 years ago.
- HomeSeerFC200_50x50.png (862 bytes) - added by gengen 5 years ago.
- HomeSeerFC200_80x80.png (857 bytes) - added by gengen 5 years ago.
- HomeSeerFC200_big.png (8.4 KB) - added by gengen 5 years ago.
- HomeSeerWD100_48x48.png (876 bytes) - added by gengen 5 years ago.
- HomeSeerWD100_50x50.png (823 bytes) - added by gengen 5 years ago.
- HomeSeerWD100_80x80.png (834 bytes) - added by gengen 5 years ago.
- HomeSeerWD100_big.png (8.9 KB) - added by gengen 5 years ago.
- HomeSeerWD200_48x48.png (964 bytes) - added by gengen 5 years ago.
- HomeSeerWD200_50x50.png (1005 bytes) - added by gengen 5 years ago.
- HomeSeerWD200_80x80.png (891 bytes) - added by gengen 5 years ago.
- HomeSeerWD200_big.png (8.6 KB) - added by gengen 5 years ago.
- HomeSeerWS100_48x48.png (564 bytes) - added by gengen 5 years ago.
- HomeSeerWS100_50x50.png (568 bytes) - added by gengen 5 years ago.
- HomeSeerWS100_80x80.png (748 bytes) - added by gengen 5 years ago.
- HomeSeerWS100_big.png (8.6 KB) - added by gengen 5 years ago.
- HomeSeerWS200_48x48.png (584 bytes) - added by gengen 5 years ago.
- HomeSeerWS200_50x50.png (537 bytes) - added by gengen 5 years ago.
- HomeSeerWS200_80x80.png (774 bytes) - added by gengen 5 years ago.
- HomeSeerWS200_big.png (8.1 KB) - added by gengen 5 years ago.
- NexiaOneTouch_48x48.png (1.0 KB) - added by gengen 5 years ago.
- NexiaOneTouch_50x50.png (1.1 KB) - added by gengen 5 years ago.
- NexiaOneTouch_80x80.png (1.6 KB) - added by gengen 5 years ago.
- NexiaOneTouch_big.png (18.2 KB) - added by gengen 5 years ago.
- EvolveLCD1_80x80.png (2.1 KB) - added by gengen 5 years ago.