| Version 11 (modified by mcvflorin, 13 years ago) (diff) |
|---|
GE Concord Alarm Panel Plugin
This plugin adds basic integration with the Concord alarm panels.
Features supported:
- Arm / disarm the partitions
- Bypass / unbypass zones
- Enable / disable chime mode
- Activate a panic alarm
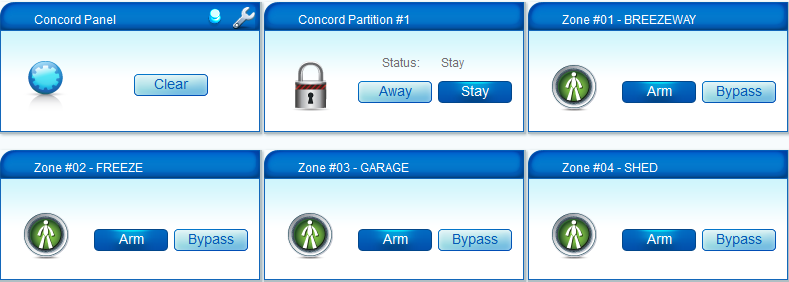
The plugin exposes the panel zones as motion sensors, so they can be used in scenes and events.
Installation
Before installing the plugin you must connect the SuperBus 2000 Automation Module to Vera using a RS-232 to USB adapter with a FTDI or Prolific chipset, like this one.
After connecting the Automation Module to Vera restart the Luup engine so that MiOS can detect the RS-232 to USB adapter. To check if the adapter was detected:
- on UI4 go to MiOS developers >> Serial port configuration;
- on UI5 go to Apps >> Develop apps >> Serial port configuration.
If Vera detected the adapter that page shouldn't be empty; instead, you should see a device which is usually called ftdi_sio if it has a FTDI chipset.
Next you must configure it:
- set the Baud to 9600;
- set the Data bits to 8;
- set the Parity to Odd;
- set the Stop bits to 1;
- leave the other parameters as they are, unless you know what you're doing.
If the adapter has been detected by MiOS and configured, you can proceed to install the plugin.
UI4
- Download http://code.mios.com/trac/mios_ge-concord/changeset/21/tags/0.91%20Beta?old_path=%2F&format=zip this] package and extract the files.
- Go MiOS developers >> Luup files and upload the extracted files. Do not check Restart Luup after upload (bottom of the page); if it's checked, uncheck it.
- Go to Create device and:
- in the Description field enter the name of the device;
- in the UpnpDevFilename field enter D_Concord.xml;
- click Create device.
- Restart the Luup engine (curved arrows in the top right of the UI).
- After the Luup engine has restarted refresh the UI (best use <CTRL + F5> to do so).
- Open the control panel of the newly created device, the Settings tab, and from the Send using drop-down select the serial adapter.
- Save.
UI5
- Install the plugin from the MiOS Marketplace (Apps >> Install Apps).
- Open the control panel of the new device, the Settings tab, and from the Send using drop-down select the serial adapter.
- Save.
Configuration
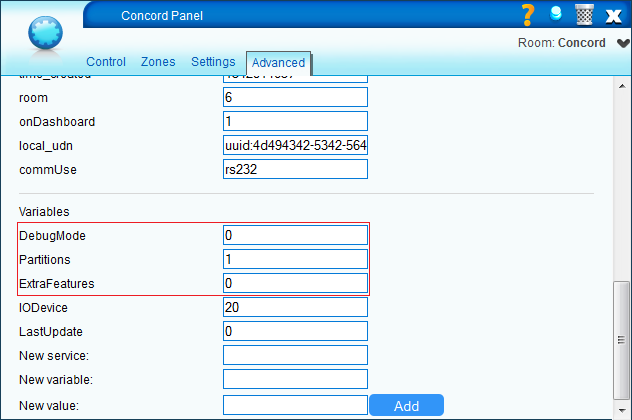
In the control panel of the alarm panel device, near the bottom of the Advanced tab, there are a few configuration parameters:
| Partitions | This is the number of partitions your panel is configured to use. This is 1 by default. Valid values: 1 to 6. |
| DebugMode | When this is 0 only the errors and the important events are written to the log file. This is 0 by default. Valid values: 0, 1. |
| ExtraFeatures | Setting this parameter to 1 allows the plugin to control some extra features. Currently Chime Mode and Quick Arm are the only extra features, but this may change in the future. This is 0 by default, because enabling this greatly increases the amount of data Vera must receive from the panel, which could slow Vera down. Only enable this if you use any of the extra features. Valid values: 0, 1. |
Usage
Basic tasks
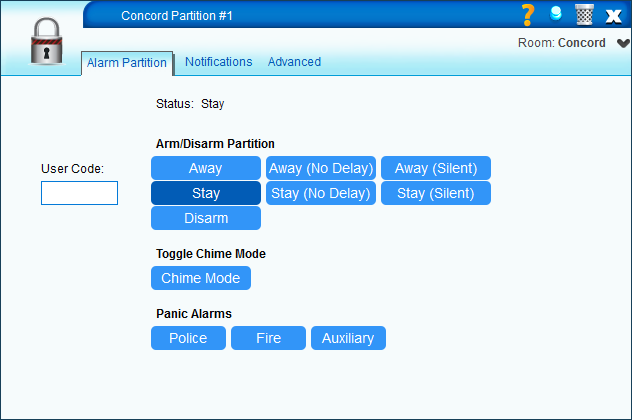
- Arm / disarm partition
- Open the control panel of the partition.
- Enter a user code valid in that partition in the User Code input box.
- Press the button for the desired arm mode. For more information on what the various arming modes mean, please consult the user manual of the alarm panel.
If Quick Arm is enabled, it's possible to arm the partition without entering the User Code. However, disarming will still require the user code.
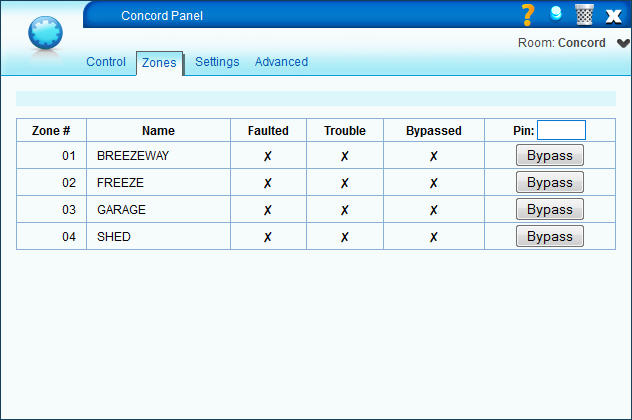
- Bypass / unbypass zone
- Open the control panel of the alarm panel device, then the Zones tab. You will see the list of the detected zones in all partitions and their status.
- Enter the user code valid in the partition the zone belongs to in the Pin input box.
- Click on the buttons to bypass/unbypass the zones.
- Wait several seconds (about 10 seconds to be sure) then click on the Zones tab again to refresh it. The plugin doesn't provide any feedback if the bypassing/arming succeeded or not, so if after 10 seconds or more the status of the zone doesn't change, it means that the action failed.
- Enable / disable Chime Mode
- Open the control panel of the partition.
- Press the Toggle Chime Mode button.
- Activate panic alarm
- Open the control panel of the partition.
- Press the button to activate the desired panic alarm.
WARNING: The alarm will go off immediately! No confirmation dialog will appear.
In scenes
- Arm / disarm partition
TODO
- Bypass / unbypass zone
TODO
- Activate panic alarm
TODO
Notes
- The Quick Arm feature cannot be controlled from the plugin. If ExtraFeatures is enabled, the Quick Arm status is displayed in the Advanced tab of the partition devices. Changing it has no effect, because it is updated to its real value at startup.
- The Away (No Delay), Away (Silent), Stay (No Delay) and Stay (Silent) buttons won't be highlighted when arming using those modes. Instead, only the Away or Stay buttons will be highlighted.
Attachments
- ui4_dashboard.png (32.8 KB) - added by mcvflorin 13 years ago.
- ui5_dashboard.png (52.6 KB) - added by mcvflorin 13 years ago.
- ui5_panel_advanced.png (34.7 KB) - added by mcvflorin 13 years ago.
- ui5_panel_zones.png (28.3 KB) - added by mcvflorin 13 years ago.
- ui5_partition_partition.png (29.9 KB) - added by mcvflorin 13 years ago.
- ui5_serial_port.png (24.6 KB) - added by mcvflorin 13 years ago.


