
| Version 2 (modified by mcvflorin, 14 years ago) (diff) |
|---|
UI5 Installation
Hardware Installation
The following section assumes you have a working Paradox Alarm Panel and have successfully connected, and configured, the Paradox Security PTR3 Printer Module.
Each of these devices comes with instructions for wiring and basic configuration. If you are not comfortable with this type of Wiring and configuration then contact your Alarm installer before proceeding.
Notes
- Configure the PTR3 Module Baud Rate
In Paradox EVO Alarm Panels this is Section [016] and in Spectra Alarm Panels this is Section [553] of the Alarm Panel configuration. The Baud Settings should be configured to 57600 Baud by setting both Options [2] & [3] to [ON]. You can use a lower Baud rate, but it will slow the communications between Vera and the Alarm Panel.
- Configure the PTR3 Module for Home Automation
In Paradox EVO Alarm Panels, this is Section [016], Option [4]. It should be set to [ON]
- Set any Zone Labels after you connect the PRT3 Module to the Combus
Only Zone Labels changed/modified after PRT3 is attached will be correctly recorded in the PRT3 Module. If you set the Zone Labels prior to connecting the PRT3, it'll only list "Default" Labels for each Zone. The Vera-Luup Alarm interface code will skip over these as if they're unused Zones. Please use the Alarm Panel's Reference and Installation manuals to determine how to setup your Zone Labels. If you've attached the PRT3 Module to an existing Alarm Panel, you can simply re-enter the Zone Labels to "trigger" it to get a copy of them.
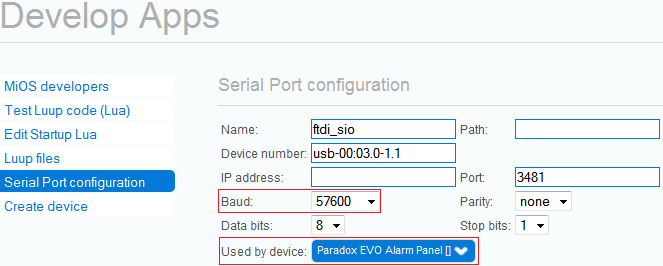
- Attach Vera to the Paradox PRT3 Module using a USB Cable After attaching Vera to the Paradox PRT3 Module, navigate to the following page in Vera: Apps >> Develop Apps >> Serial Port configuration
Change the Baud rate to 57600, matching the Alarm Panel, and press Save.
Software Installation
- Go to Apps -> Install Apps and install the plugin.
- After the plugin has been installed go to Apps >> Develop Apps >> Serial Port configuration and select the alarm panel device from the Used by device drop-down list.
- Save. After Luup restarted, reload the UI.
The Alarm Panel Plugin code will now read configuration data from the Alarm Panel, such as the number of Areas, Zones and Users. Once complete, Vera will present you with a list of these Alarm Panel Zones in the "unassigned" Devices area. You can Assign the Alarm Panel's Zones to Rooms within Vera, and then (Save) at the end to ensure these settings are persisted.
Attachments
- ui5_serial_port_config.png (15.3 KB) - added by mcvflorin 14 years ago.