
This MiOS plugin interfaces with devices in the Belkin WeMo range.

Supported devices
- WeMo Switch: an appliance switch.
- WeMo Motion: a motion sensor.
Supported devices are recognized by the plugin and are presented in the dashboard as a child device.
Unsupported devices
- WeMo Baby: a remote microphone.
Unsupported devices will not be recognized by the plugin.
WeMo technology
WeMo devices use 2.4 GHz Wi-Fi to connect to your LAN and the Internet. On the LAN, WeMo devices are visible as Universal plug-and-play (UPnP) devices. The MiOS plugin acts as a UPnP control point specialized to communicate with WeMo switches and sensors. WeMo devices also operate an external secure tunnel to Belkin's own servers to permit remote control through the iOS app. This is a separate protocol to UPnP, not spoken by the MiOS plugin.
Prerequisite setup
You will need the official Belkin WeMo app for iOS to set up new WeMo devices and add them to your Wi-Fi network. You will also need the app to upgrade WeMo firmware. For day-to-day use you do not need the iOS app at all.
Set up all your WeMo devices with the iOS app before installing the MiOS plugin. It is recommended that you assign a fixed IP address to each WeMo device using your router's DHCP Reservation feature; this will help the MiOS plugin to re-establish connections to the devices more quickly and reliably when it starts.
If you want to interface with If This Then That IFTTT, register an account with IFTTT and set up your rules.
Installing the plugin
Install the plugin from apps.mios.com. If you have WeMo Motion sensors, or want to receive instant status updates in the dashboard when a switch is changed through the iPhone app or IFTTT, also install the UPnP Event Proxy plugin. (Note that the UPnP Event Proxy has extra uninstallation steps.)
Discovering WeMo devices
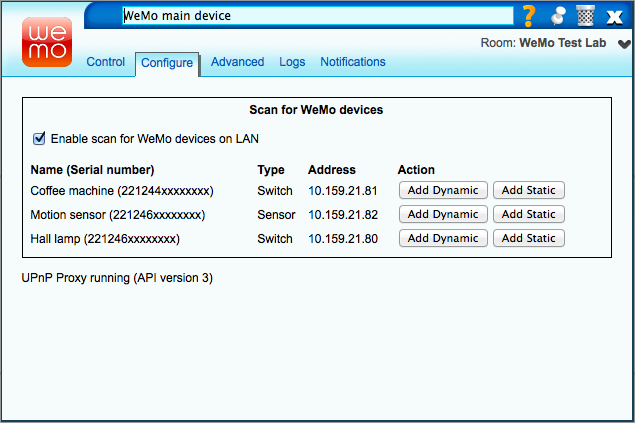
On the plugin's main device, click the spanner/wrench and go to the Configure tab. Ensure that the Enable scan for WeMo devices on LAN option is turned on.

The Configure page lists all of the WeMo switch and sensor devices that were found on your LAN. (Note that sometimes a device will not respond to discovery. Reload the Luup engine and the plugin will attempt discovery again. Devices on different subnets will not be discovered.)
For each device that you want Vera to know about, press one of the Add buttons. Press Add Static if you allocated that WeMo device a fixed IP address through your router; press Add Dynamic otherwise.
Once you have added all devices, close the device dialog and press SAVE.
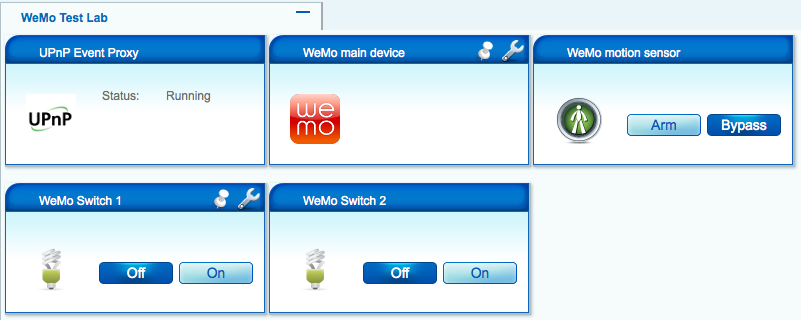
On restarting the Luup engine, child devices will appear for each WeMo device. You can rename these and place them in rooms.
Adding devices manually
If discovery does not work, you can add WeMo devices manually. Enter the device's IP address and type (switch or sensor) in the Manually add WeMo device fields and press Add Static. (Dynamic addresses are not supported with manual adding, so you must allocate a fixed IP address through your router's DHCP reservation feature.)
Removing devices
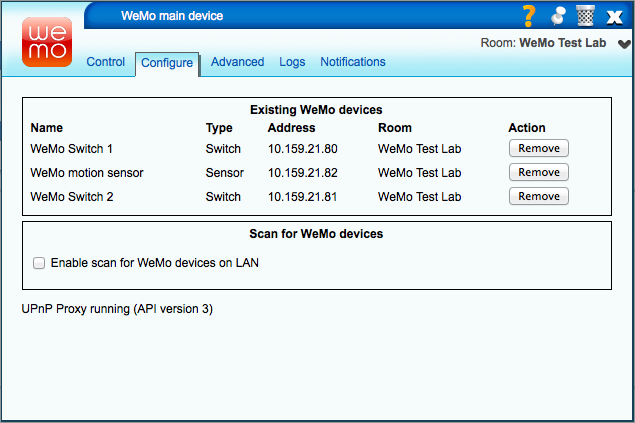
To remove a WeMo device, go to the Configure page and press Remove for the devices that you want to remove. Close the device dialog and press SAVE.

Controlling devices
Child devices follow the same conventions as other MiOS switches and sensors.
WeMo switches
Switches show their on/off status in the dashboard. Clicking On or Off will change the state.
Service variables:
| Namespace | Variable name | Meaning |
|---|---|---|
| urn:upnp-org:serviceId:SwitchPower1 | Status | 0 if switch is off; 1 if switch is on |
Actions:
| Namespace | Action name | Parameters | Meaning |
|---|---|---|---|
| urn:upnp-org:serviceId:SwitchPower1 | SetTarget | newTargetValue: 0 to turn switch off; 1 to turn switch on | Set the switch to the specified state |
Events:
| Name | Meaning |
|---|---|
| A device is turned on or off | The switch status has changed from on to off, or from off to on |
WeMo sensors
Sensors show their tripped status in the dashboard. Clicking Arm or Bypass affects only the Vera internal state; it has no effect on the WeMo sensor and will not affect whether WeMo rules fire.
Service variables:
| Namespace | Variable name | Meaning |
|---|---|---|
| urn:micasaverde-com:serviceId:SecuritySensor1 | Tripped | 0 if no motion detected; 1 if motion was detected in the last 2 seconds |
| urn:micasaverde-com:serviceId:SecuritySensor1 | Armed | 0 the sensor is bypassed; 1 if the sensor is armed |
Actions:
| Namespace | Action name | Parameters | Meaning |
|---|---|---|---|
| urn:micasaverde-com:serviceId:SecuritySensor1 | SetArmed | newArmedValue: 0 to bypass the sensor; 1 to arm the sensor | Set the sensor's arm/bypass state |
Events:
| Name | Meaning |
|---|---|
| A sensor (door/window/motion/etc.) is tripped | Fires when motion is detected |
| An armed sensor is tripped | Fires when motion is detected and the sensor is armed |
Troubleshooting
Discovery relies on the SSDP protocol, which uses UDP multicast packets that may not be forwarded across network segments. If your Vera is connected to your LAN using Ethernet, your wireless access point and/or router must be configured to forward multicast from the wired to the wireless segments. Whether your access point has such an option (and if it does, what the option is called) depends on its brand and model. Look for phrases such as Isolate wireless clients (should be off); Bridge wired and wireless networks (should be on); IGMP snooping (should be off). If your wired and wireless segments are served different DHCP ranges, ensure that they have overlapping netmasks so that they are on the same layer 2 subnet.
Some consumer routers cannot forward multicast packets from the wired to wireless segments. In this case, your choices are to put your Vera onto the wireless network (either by using a wireless-capable Vera or by using a Wi-Fi-to-Ethernet bridge), or to forgo automatic discovery and adding your WeMo devices manually.
Attachments
- Discovery.png (69.9 KB) - added by futzle 12 years ago.
- Removal.png (69.6 KB) - added by futzle 12 years ago.
- Screenshot.png (53.4 KB) - added by futzle 12 years ago.