
| Version 15 (modified by futzle, 14 years ago) (diff) |
|---|
Discussion for this Luup plugin is on the Micasaverde forum at http://forum.micasaverde.com/index.php?topic=4060.0
Got one of these panels? You can help by testing test scenarios that I don't have equipment for.
Introduction
The NX series of alarm panels from (in various parts of the world) GE, Interlogix, Caddx, Networx, Hills or DAS Systems has a serial interface which lets you monitor partitions and zones, arm and disarm the system, and program the panel.
Some alarm panels (e.g., the NX-8E) have this serial interface built in. Other panels have no onboard serial interface and require the connection of the NX-584 expander, which contains only the serial interface. The protocol for the NX-8E and the NX-584 is the same.
This Luup plugin provides continuous monitoring of partitions and zones, reporting partitions' armed status and zones' tripped and bypass status, whether the system is armed or not. Additionally, if configured, the plugin can send Arm and Disarm events to the panel, allowing remote arming and disarming of partitions through scenes.
Preparing the alarm system interface
The NX-584 must be programmed from a keypad connected to the alarm system.
Set the baud rate to match the setting on the other end of the serial cable. I use 38400, the default.
The interface must accept the following message types:
- Interface configuration message 01h
- Zone status message 04h
- Zones snapshot message 05h
- Partition status message 06h
- Partitions snapshot message 07h
- System status message 08h
- Interface configuration request 21h
- Zone status request 24h
- Zones snapshot request 25h
- Partition status request 26h
- Partitions snapshot request 27h
- System status request 28h
Optional message types:
- Zone name message 03h and Zone name request 23h, if you have keypads that can display zone names and you want the plugin to fetch the names of the zones from the keypad.
- Set clock/calendar command 3Bh, if you want Vera to set the clock on the panel whenever the Luup plugin is started.
- Primary keypad function with PIN 3Ch, if you want Vera to be able to arm or disarm a partition with a PIN.
- Secondary keypad function 3Eh, if you want Vera to be able to run Quick Arm and Quick Stay.
- Zone bypass toggle 3Fh, if you want Vera to be able to arm or bypass zones.
- Log Message 0Ah, if you want to get system status information from the panel.
(Todo: write instructions for this, referring to the NX-584 installation manual.)
Connecting Vera to the NX-584/NX-8E
Physically connecting the alarm panel to Vera varies depending on your own situation.
Upload the plugin files to Vera
Download these files from http://code.mios.com/trac/mios_caddxnx584/browser/trunk and transfer them all to Vera:
- D_CaddxNX584Security.xml
- D_CaddxNX584Security.json
- I_CaddxNX584Security.xml
- J_CaddxNX584Security.js
- L_CaddxNX584Security.lua
- S_CaddxNX584Security.xml
- D_CaddxNX584Partition2.xml
- D_CaddxNX584Partition2.json
- S_AlarmPartition2.xml (This is the de facto standard Alarm Partition file, so a copy may already be on your Vera.)
Create the Luup device
- Enter Vera setup, select Devices, the Luup Plugins. Scroll to the bottom to Add Device.
- In the UpnpDevFilename text box, enter D_CaddxNX584Security.xml and click Add Device.
- Give the device a name and assign it to a room.
- Go to Serial Port Configuration and assign the serial port (local or IPSerial) to the Luup device you just created.
- Save.
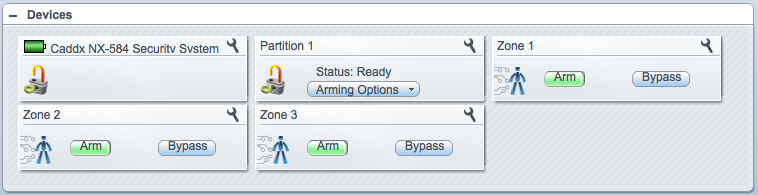
The plugin creates a device for the alarm system, and one device for each alarm partition. Partitions are detected automatically.

Scan for zones
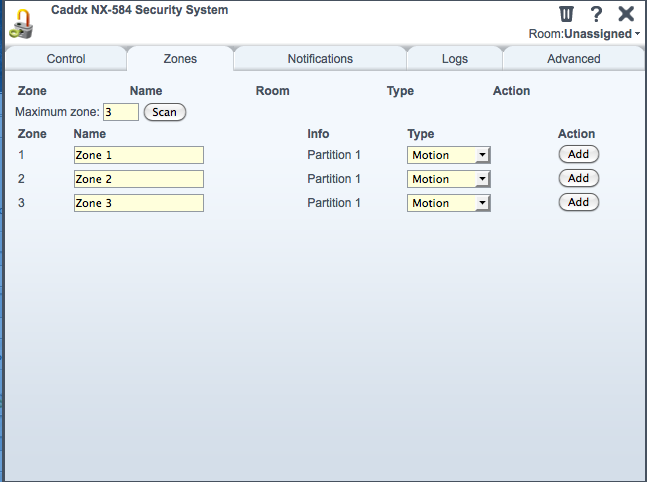
Zones are not detected automatically, so you must scan for the zones that your alarm system has. Click on the main alarm device's configuration icon (spanner/wrench), and go to the Zones tab. (It may be necessary to click the tab a second time.)
To scan for zones, enter the highest-numbered zone in your system into the Maximum zone text box, and click Scan. The plugin asks the alarm panel for all zones from 1 to the maximum, and (if it is supported and you have enabled it), each zone's name. Edit each zone's name and click Add.

On the next Luup engine reload (press SAVE on the main window), the new zones will be created as child devices.

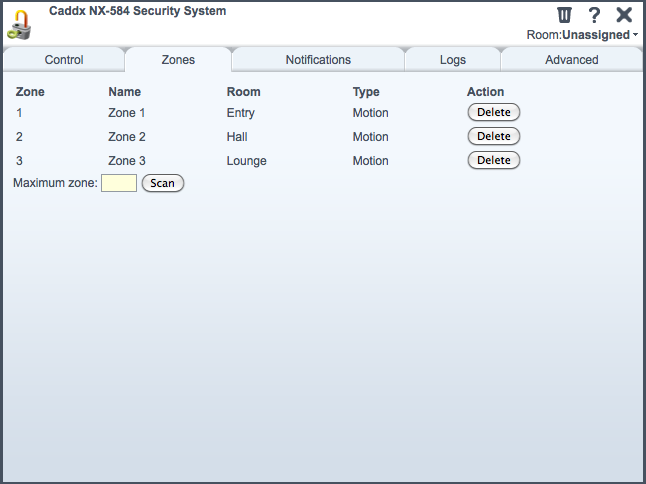
You can rename and relocate zones to other rooms. If you want to delete a zone, do this from the same Zones tab that you used to add zones.

Attachments
- CaddxNX584AfterCreation.png (25.5 KB) - added by futzle 14 years ago.
- CaddxNX584ZoneScanBefore.png (47.2 KB) - added by futzle 14 years ago.
- CaddxNX584WithZones.png (45.6 KB) - added by futzle 14 years ago.
- CaddxNX584ZoneScanAfter.png (42.0 KB) - added by futzle 14 years ago.