
Installation
Hardware Installation
The following section assumes you have a working Paradox Alarm Panel and have successfully connected, and configured, the Paradox Security PTR3 Printer Module.
Each of these devices comes with instructions for wiring and basic configuration. If you are not comfortable with this type of Wiring and configuration then contact your Alarm installer before proceeding.
Notes
- Configure the PTR3 Module Baud Rate
In Paradox EVO Alarm Panels this is Section [016] and in Spectra Alarm Panels this is Section [553] of the Alarm Panel configuration. The Baud Settings should be configured to 57600 Baud by setting both Options [2] & [3] to [ON]. You can use a lower Baud rate, but it will slow the communications between Vera and the Alarm Panel.
- Configure the PTR3 Module for Home Automation
In Paradox EVO Alarm Panels, this is Section [016], Option [4]. It should be set to [ON]
- Set any Zone Labels after you connect the PRT3 Module to the Combus
Only Zone Labels changed/modified after PRT3 is attached will be correctly recorded in the PRT3 Module. If you set the Zone Labels prior to connecting the PRT3, it'll only list "Default" Labels for each Zone. The Vera-Luup Alarm interface code will skip over these as if they're unused Zones. Please use the Alarm Panel's Reference and Installation manuals to determine how to setup your Zone Labels. If you've attached the PRT3 Module to an existing Alarm Panel, you can simply re-enter the Zone Labels to "trigger" it to get a copy of them.
- Attach Vera to the Paradox PRT3 Module using a USB Cable
After attaching Vera to the Paradox PRT3 Module, navigate to the following pane in Vera:
Devices >> Luup Plugins >> Serial Port configuration
which should show settings similar to these
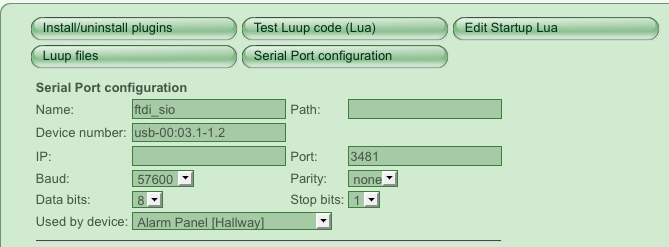 You can now change the Baud rate to 57600, matching the Alarm Panel, and press (Save).

Software Installation
Initial Configuration
- Download the ZIP file [http://www.box.net/shared/7z73h1mj6t ParadoxSecurity.1.1.zip]
- Expand the ZIP File to extract the 4x files, their names should be exactly as follows:
- D_AlarmPartition1.xml
- D_ParadoxSecurityEVO.xml
- I_ParadoxSecurityEVO.xml
- S_AlarmPartition1.xml
- Goto Devices --> Luup plugins --> Luup files
- Click the (Browse) buttons on the right, and enter the 4 filenames references above.
- Select the checkbox "[x] Restart Luup after upload" and click (Go)
- ... wait whilst it uploads and restarts the Lua engine ...
- If successful, you'll see the 4x files listed in the System.
- Navigate to Devices, scroll to the bottom at the Add device form.
- Type "D_ParadoxSecurityEVO.xml", and click (Add Device), type in a name, such as Paradox Alarm Panel against the device then click (Save).
- For the lines that follow, we'll assume that you named the device Paradox Alarm Panel but you can call it anything.
- Goto Devices --> Luup plugins --> (Serial Port configuration)
- Select the Paradox Alarm Panel [...] value for the Used by device: picklist then click (Save).
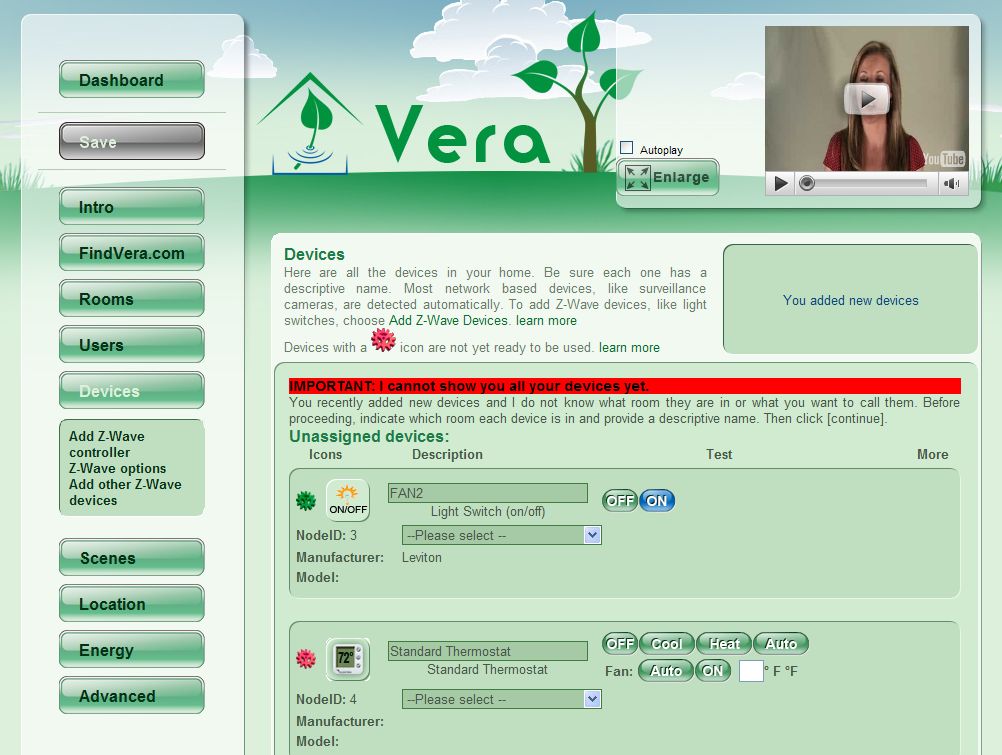
The Alarm Panel Plugin code will now read configuration data from the Alarm Panel, such as the number of Areas, Zones and Users. Once complete, Vera will present you with Vera's Unassigned Devices UI, letting you Assign the Alarm Panel's Zones to Rooms within Vera.
Here's a copy of Vera's Generic Unassigned Devices UI for reference:

Validating the Configuration
This section not intentionally left blank, it's just not finished yet :)
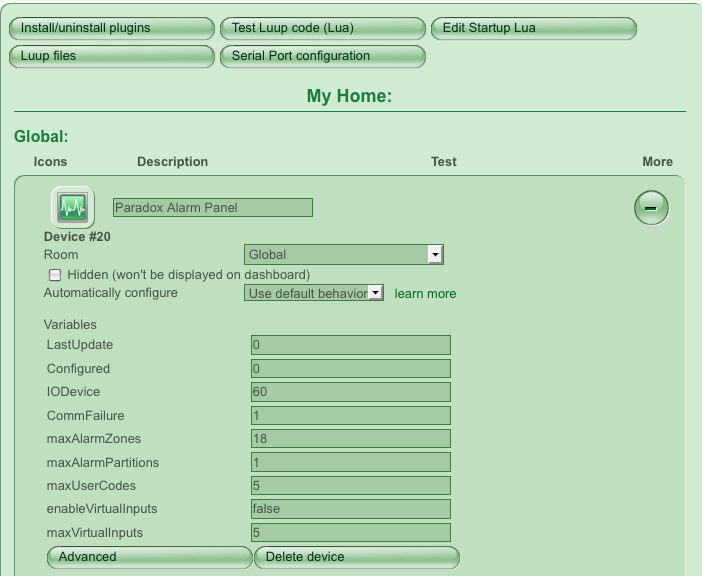
Advanced Configuration
There are a number of advanced options that can be setup after performing the initial configuration, and validating it's working correctly. These are exposed through Variables listed under:
Devices --> Luup plugins --> Your Alarm Panel Device -> (+)

- maxAlarmZones (number, default 24)
- The number of Zones that the Alarm Panel Plugin should scan during startup. Depending upon the Alarm panel model, it can support 48, 96, or 192 Zones. Each takes some time to scan. To speed startup, set this parameter to the number of Zones installed within your particular System.
- maxAlarmPartitions (number, default 1)
- The number of Areas/Partitions? that the Alarm Panel Plugin should scan during startup. The Alarm Panel typically supports 4 or more Areas/Partitions? but most houses use only one, or maybe 2, of these Partitions. The Alarm Panel Plugin defaults to loading 1 Partition. This parameter may be used to increase the number of Partitions configured into Vera if you have more in your installation.
- maxUserCodes (number, default 5)
- The number of User codes registered with the Alarm Panel. The Alarm Panel may support 96, 192 or more Users and reducing this parameter decreases the startup time of the Plugin. At this time, only logging messages use the User strings but future functionality may permit Scene events based upon User descriptions retrieved by this parameter.
- enableVirtualInputs (boolean, default false)
- Enable the Alarm Panel's Virtual Inputs to be represented within Vera's UI. Intended for people that use the Paradox Alarm Panel Virtual input functionality.
- maxVirtualInputs (number, default 5, if enableVirtualInputs is set)
- If enableVirtualInputs is set, this parameter determines how many Virtual Inputs need to be established within Vera (up to the Max# of Virtual inputs of the Paradox Alarm Panel)
- enableRemoteArm (string, default false)
- Enable the use of Stay Arm (stay), Stay and Regular Arm (arm) or Stay, Regular and Disarm (disarm) functionality within the Plugin.
Scenes
The Plugin supports participation in Scenes, by generating Events and accepting/processing Actions.
Events
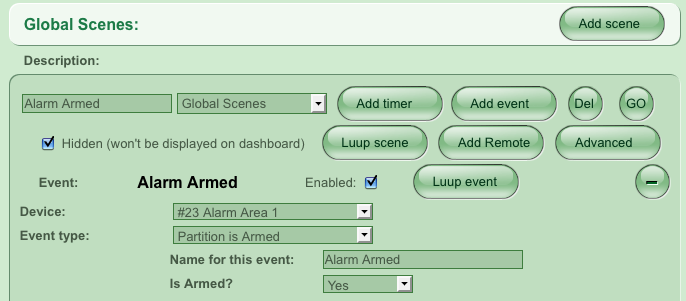
Each Alarm Partition is exposed as a !AlarmPartition1, and has the following scene capabilities
 Example Alarm Partition Scene
- Partition is Armed
- Partition is Stay-Armed
- Partition is Breached
- Partition is Disarmed
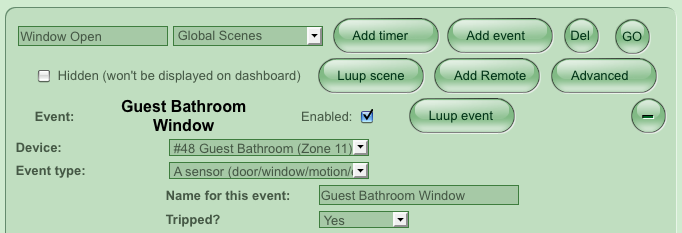
Each Alarm Zone is exposed a standard !MotionSensor1, and has the following standard Motion Sensor scene capabilities
 Example Alarm Zone Scene
- A sensor (door/window/motion/etc.) is tripped
Actions
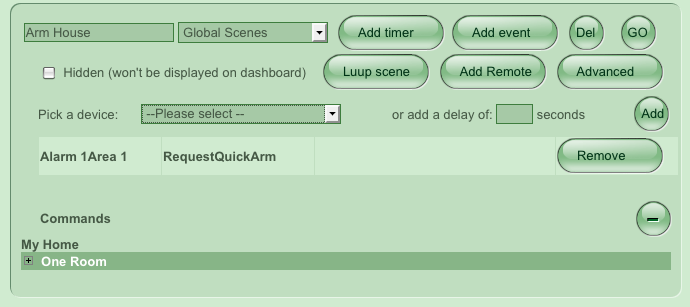
Each Alarm Partition is exposed as a !AlarmPartition1, and has the following Actions (if Enabled)
 Example Alarm Partition Action
- RequestArm - Submit a request to Arm the Alarm Partition (with PINCode)
- RequestQuickArm - Submit a request to Quick, or "OneTouch", Arm the Alarm Partition (no PINCode required)
- RequestStay - Submit a request to Stay-Arm the Alarm Partition (with PINCode)
- RequestQuickStay - Submit a request to Quick, or "OneTouch", Stay-Arm the Alarm Partition (no PINCode required)
- RequestDisarm - Submit a request to Disarm the Alarm Partition (PINCode required)
- SetVirtualInput - Set one of the [16] Virtual Inputs on the Alarm Panel to Open (0) or Closed (1)
Scripting
... some Luup scripting please...
Errors
The Paradox Alarm Plugin unconditionally logs all Alarm Panel events in Vera's log file. These events have been translated into their English equivalent from the internal codes that the Alarm Panel uses.
Examples include:
01 ... luup_log:nn: 001:Zone is Open, 015:Motion Upstairs (Zone 15), 001:Area 101 ... luup_log:nn: 000:Zone is OK, 015:Motion Upstairs (Zone 15), 001:Area 1
01 ... luup_log:nn: 014:Disarm with User Code, 002:User Code 2, 001:Area 1
01 ... luup_log:nn: 064:Status 1, 000:Armed, 001:Area 1
01 ... luup_log:nn: 009:Arming with Master, 001:User Code 1, 001:Area 1
01 ... luup_log:nn: 004:Non-reportable Event, 007:Remote control access, 000:Occurs in all areas enabled in the system
Attachments
- ParadocAlarm-UnnasignedDevices-UI2.jpg (115.8 KB) - added by guessed 15 years ago.
- ParadoxAlarm-DevicesViewAdvanced-UI2.png (65.9 KB) - added by guessed 15 years ago.
- ParadoxAlarm-ScenesAction-UI2.png (43.8 KB) - added by guessed 15 years ago.
- ParadoxAlarm-ScenesZone-UI2.png (47.2 KB) - added by guessed 15 years ago.
- ParadoxAlarm-ScenesPartition-UI2.png (52.4 KB) - added by guessed 15 years ago.
- ParadoxAlarm-UnnasignedDevices-UI2.jpg (115.8 KB) - added by guessed 15 years ago.
- ParadoxAlarm-VeraSerialConfig-UI2.png (34.8 KB) - added by guessed 15 years ago.