

The Sonos Wireless HiFi Music Systems plugin for Vera
This plugin permits control of your Sonos via Vera scenes and Vera UI.
As a bonus, a Text to Speech feature is included.
Installation
What you need
- Vera with UI4, UI5, UI6 (not tested) or UI7
- At least one Sonos Zone
- The UPnP event proxy plugin: http://code.mios.com/trac/mios_upnp-event-proxy# If this plugin is installed in parallel of the Sonos plugin, the Sonos plugin will work in a more efficient way (highly recommended)
- The Sonos plugin
How To (installation from the MiOS Marketplace)
It is the recommended method for installing the plugin. The plugin version available in the MiOS Marketplace is for UI5, UI6 and UI7; you need at least version 1.1 for UI6 and UI7. For UI4, please read the chapter "How To (manual installation)".
- (recommended) Install the UPnP event proxy plugin from the MiOS Marketplace.
- Install the Sonos plugin from the MiOS Marketplace.
- When installation is done (after the creation of a new device and a reload of the lua engine), refresh your Web browser cache (Ctrl+F5 in most of the browsers) before starting the setup step
How To (manual installation)
It is the installation method required for UI4 or if you don't have access to the MiOS marketplace.
- (recommended) Install the UPnP event proxy plugin from the MiOS Marketplace.
- Download the plugin files using the Zip Archive link at the bottom of this page: http://code.mios.com/trac/mios_sonos-wireless-music-systems/browser/tags/1.2
- Upload the Sonos plugin files:
- Unzip the ZIP archive
- For UI4 users only: rename D_Sonos1_UI4.json into D_Sonos1.json
- Use WinSCP ( http://winscp.net/eng/index.php ) to upload certain files:
- the following PNG files go into /www/cmh/skins/default/icons/
- Sonos.png
- Sonos_0.png
- Sonos_25.png
- Sonos_50.png
- Sonos_75.png
- Sonos_100.png
- Sonos_125.png
- Sonos_150.png
- All other files can be uploaded using the normal MiOS UI
- the following PNG files go into /www/cmh/skins/default/icons/
- In the Toolbox section (UI4) or APPS section (UI5), open MiOS Developers (UI4) or Develop Apps (UI5) >> Luup Files and upload the following files, uncheck the Restart Luup after upload checkbox and click GO
- S_SonosAVTransport1.xml
- S_SonosGroupRenderingControl1.xml
- S_SonosRenderingControl1.xml
- In the Toolbox section (UI4) or APPS section (UI5), open MiOS Developers (UI4) or Develop Apps (UI5) >> Luup Files and upload the following files, check the Restart Luup after upload checkbox and click GO
- D_Sonos1.xml
- D_Sonos1.json
- I_Sonos1.xml
- J_Sonos1.js
- L_Sonos1.lua
- L_SonosTTS.lua
- S_Sonos1.xml
Create a Sonos device
If you installed the plugin from the MiOS Marketplace, one device is automatically created. But if you have several Sonos zones and you want to drive more than one Sonos zone with the Vera, you have to add additional devices in the Vera, one for each zone you want to control.
- Open Toolbox section (UI4) or APPS section (UI5); open MiOS Developers (UI4) or Develop Apps (UI5) >> Create Device.
- In the !Upnp Device Filename input box enter D_Sonos1.xml.
- In the Description input box enter a name for the panel device, e.g. Sonos Living Room.
- In the Ip Address input box enter the IP address of your Sonos zone (you can find this information opening About my Sonos system in your Sonos application) or leave it blank and run later the next step "Select your Sonos".
- In the Parent device list box select No parent.
- Click Create device.
- (UI4) Close this window and Save.
- (UI5) Close the popup window that informs you about the creation of a new device, then push the Reload button.
- When reload is done, refresh your Web browser cache (Ctrl+F5 in most of the browsers)
If you installed the plugin from the Marketplace and you are running UI7, an easier way to create an additional device is the following:
- Open Apps menu; open My apps sub-menu.
- Push the Details button in front of your Sonos plugin.
- Push the Create another button.
- Wait for the automatic reload, then refresh your Web browser cache (Ctrl+F5 in most of the browsers)
Select your Sonos
This step will allow to link a Vera device to a physical Sonos unit. It is required for the device automatically created when installing the plugin from the Marketplace or for the additional devices you created without specifying a IP address. Note it can be used to assign the Vera device to a different Sonos. It can be useful in case your Sonos has been assigned a new IP address. Please note that you must avoid having several Vera devices linked to the same physical Sonos (same IP).
- Find your new device in the UI,
- Click on its wrench button,
- Open the Settings tab,
- Push the Discover button and wait for few seconds until the selection box is filled and the Select button is enabled again,
- Select your Sonos in the selection box and then push the Select button,
- If the automatic discovery is not working (the selection box remains empty), you can enter the IP address of your Sonos zone in the field New IPand then push the Select button,
- Wait for few seconds for a complete initialiazation
Automatic discovery (UPnP discovery) could require an additional network setup of your Vera Lite, consisting in an update of the routing table of your Vera. Do it only if necessary. You can install and uninstall this patch using the plugin UI:
- Find your new device in the UI,
- Click on its wrench button,
- Open the Settings tab,
- Push the Install button to install the patch or Uninstall button to uninstall the patch.
- Wait for the automatic reload.
For technical explanation of what is done by this patch, please read this message: http://forum.micasaverde.com/index.php/topic,16905.msg132502.html#msg132502
User Interface (outdated)


Scenes
Creating a Sonos scene under UI5 (outdated)
 To use the Sonos device under UI5, follow the steps outlined below.
- Create New Scene
- Give the scene a name, such as Play Sonos
- Select the [Advanced] option/tab
- Select the Sonos device
- Click (Add)
- Then from the drop down options list created below, Choose SetFileToPlay and enter the full location of the NAS file
e.g. 192.168.1.10/media/Music/Mp3s/Changes.mp3
Now you have selected the file, you need to tell the Sonos to play it
- Select the Sonos device again
- Click (Add)
- Then from the drop down option list created below, Choose 'Play'
- Confirm Changes & (Save)
Now you should have a scene that, once run, will play the track you've selected.
Notes:
- The above bypasses the Sonos queue and will just play the selected track only.
- If you know the length of the track being played you can set a delay to occur
e.g 3.45mins and set another file to play.
Making a Sonos play something
This functionality is exposed declaratively through the PlayURI action under Advanced Scenes. The functionality is also exposed programmatically via Lua code:
luup.call_action("urn:micasaverde-com:serviceId:Sonos1", "PlayURI",
                 {URIToPlay="x-file-cifs:...", Volume=50},
                 666)
This action will play what is defined by the URIToPlay parameter. To know how to set this parameter, you can open the Help tab of the Vera Sonos device, you will discover a list of example usages with your current own context. Here are examples:
- x-file-cifs:path - Play the music file defined by "path"
- x-rincon-mp3radio:url - Play the MP3 WEB radio defined by "url"
- Q: - Play what is in the Sonos queue, starting at first item
- Q:3 - Play what is in the Sonos queue, starting at third item
- AI: - Play the local line-in audio input
- AI:name - Play the line-in audio input of the Sonos unit with name "name"
- TR:id - Play the tunein radio station having "id" (a number) as id
- SR:id - Play the Sirius radio station having "id" as id
- FR:radio - Play the favorite radio station having "radio" as name
- SF:title - Play the Sonos favorite having "title" as title
- SQ:name - Play the Sonos playlist having "name" as name
- GZ:name - Group the Sonos to Sonos with name "name"
Notes:
- Parameters not specified will default internally. (Volume=nil) By default, the volume is not set.
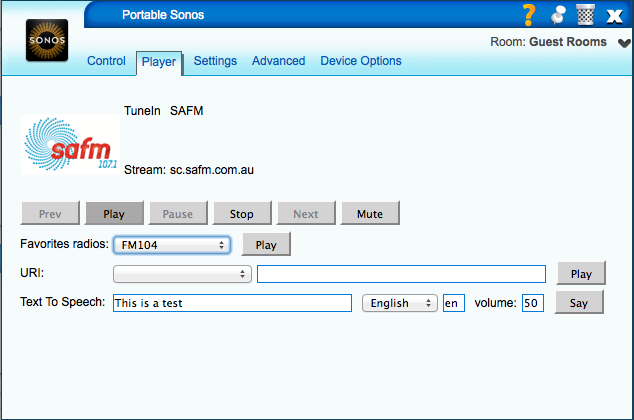
Making a Sonos say something
The Sonos plugin exposes Text to Speech capability through Google's service. The functionality is exposed declaratively through the Say action under Advanced Scenes. The functionality is also exposed programmatically via Lua code.
Suppose you have 4 Sonos zones named Bedroom, Bathroom, Living-room and Kitchen. Your bedroom Sonos is linked to device 666 in your Vera.
To play a message only in the bedroom, use this lua code:
luup.call_action("urn:micasaverde-com:serviceId:Sonos1", "Say",
                 {Text="The sun shines outside", Language="en"},
                 666)
This action will pause the current playback, say the text, and then the playback will be resumed.
Language is either a string of 2 characters, like en, fr ... or a string of 5 characters like en-US, en-GB, fr-FR, fr-CA, ...
To play a message in the bedroom setting the volume for the message at level 60:
luup.call_action("urn:micasaverde-com:serviceId:Sonos1", "Say",
                 {Text="The sun shines outside", Language="en", Volume=60},
                 666)
The volume will be adjusted to play the message, and finally restored to its previous level. When the Volume parameter is not used, the volume is not adjusted and the message is played with the current volume.
To play a synchronized message in the bedroom, the bathroom and the kitchen:
luup.call_action("urn:micasaverde-com:serviceId:Sonos1", "Say",
                 {Text="The sun shines outside", Language="en", GroupZones="Bathroom,Kitchen"},
                 666)
After the text is said, the playback will be resumed on the 3 zones.
To play a synchronized message in all rooms setting the volume for the message at level 60 in all rooms:
luup.call_action("urn:micasaverde-com:serviceId:Sonos1", "Say",
                 {Text="The sun shines outside", Language="en", GroupZones="ALL",
                  Volume=60, SameVolumeForAll="true"},
                 666)
When the parameter SameVolumeForAll is set to false or not set, the volume is adjusted only on the main zone, that is the bedroom in our example.
To play a message in the bedroom using your personal OSX TTS server rather than using Google Internet service:
luup.call_action("urn:micasaverde-com:serviceId:Sonos1", "Say",
                 {Text="The sun shines outside", Language="en", Engine="OSX_TTS_SERVER"},
                 666)
Four accepted values for the engine:
- "GOOGLE" for the Google TTS Internet service
- "MICROSOFT" for the Microsoft Translator Internet service
- "OSX_TTS_SERVER" for a personal OSX TTS server
- "MARY" for a personal MaryTTS server
In addition, the Text to Speech capability can be setup with the following variables (use the TTS tab to adjust the values):
- DefaultLanguageTTS - default language used when calling the Say action; must be either a string of 2 characters like "en" for example or a string of 5 characters like "en-US" or "en-GB" for example
- DefaultEngineTTS - default engine used when calling the Say action; must be either GOOGLE, MICROSOFT, OSX_TTS_SERVER or MARY
- GoogleTTSServerURL - the Google URL to be used
- OSXTTSServerURL - defines the location of your OSX TTS server; something like http://www.mypersonaltts.org:80
- MaryTTSServerURL - defines the location of your MaryTTS server; something like http://192.168.0.50:59125 assuming 192.168.0.50 is the IP address of your server running MaryTTS
- MicrosoftClientId - Client ID you got when you regisered your application on the Microsoft Azure Marketplace
- MicrosoftClientSecret - Client Secret you got when you regisered your application on the Microsoft Azure Marketplace
Notes:
- Google service is already not working every time (generally only few times per day) and may be removed at any time
- Explanations on how to get Microsoft Translator credentials: https://msdn.microsoft.com/en-us/library/mt146806.aspx ; don't forget to get the free 2 Million characters per month subscription; finally set your Client ID and Client Secret in the TTS tab of the plugin (and push the Set button to save)
- Explanations on how to setup the OSX TTS server: http://wolfpaulus.com/jounal/mac/ttsserver/
- For GroupZones, you have to use room names (zone names defined with your Sonos application), not the name of your Vera device
- It is possible to use the parameter named GroupDevices in place of GroupZones. In this case, you must have a device in the Vera for all the Sonos zones you want to address. The value is a CSV list of device ids. For example, if your living-room and kitchen Sonos are linked respectively to devices 667 and 668 in your Vera, you will use GroupDevices="667,668". The GroupDevices has been kept for compatibility reasons with old versions but the use of GroupZones is now recommended.
- Parameters not specified will default internally. (Language=en, Engine=GOOGLE, GroupDevices="", GroupZones="", Volume=nil, SameVolumeForAll=false)
Making a Sonos play an alert message
This functionality is exposed declaratively through the Alert action under Advanced Scenes. The functionality is also exposed programmatically via Lua code:
luup.call_action("urn:micasaverde-com:serviceId:Sonos1", "Alert",
                 {URI="x-file-cifs:...", Duration=15},
                 666)
If Duration parameter is set to a greater value than 0, this action will pause the current playback, play the alert, and the previous playback will be resumed when the delay defined by Duration expires. If Duration parameter is unset or set to 0, this action will pause the current playback, play the alert, but then the previous playback will not be resumed.
You can use the optional parameters Volume, SameVolumeForAll, GroupZones and GroupDevices. The usage is exactly the same as for the Say action.
Notes:
- For URI parameter, you can use the same syntax as for the !URIToPlay parameter of the action !PlayURI
- For GroupZones, you have to use room names (zone names defined with your Sonos application), not the name of your Vera device
- It is possible to use the parameter named GroupDevices in place of GroupZones. In this case, you must have a device in the Vera for all the Sonos zones you want to address. The value is a CSV list of device ids. For example, if your living-room and kitchen Sonos are linked respectively to devices 667 and 668 in your Vera, you will use GroupDevices="667,668". The GroupDevices has been kept for compatibility reasons with old versions but the use of GroupZones is now recommended.
- Parameters not specified will default internally. (Duration=0, GroupDevices="", GroupZones="", Volume=nil, SameVolumeForAll=false) By default, the volume is not set.
Service Variables
urn:micasaverde-com:serviceId:Sonos1
- CurrentService - name of the current service, for example "TuneIn"
- CheckStateRate - number of minutes between each automatic online check, "0" to disable the automatic check
- DebugLogs - "1" when the debug logs are enabled or "0" when disabled
- DefaultLanguageTTS - default language for TTS, for example "en" or "en-US"
- DefaultEngineTTS - default engine for TTS, either "GOOGLE" or "MICROSOFT" or "OSX_TTS_SERVER" or "MARY"
- DiscoveryPatchInstalled - "1" when the !UPnP discovery patch is installed or "0" when not installed
- DiscoveryResult - for plugin internal usage
- FetchQueue - "1" when the Sonos queue is read by the plugin or "0" when not
- GoogleTTSServerURL - the Google URL to be used for TTS
- GroupCoordinator - UUID of the group coordinator
- MaryTTSServerURL - URL of the MaryTTS server
- MicrosoftClientId - Client ID you got when you regisered your application on the Microsoft Azure Marketplace
- MicrosoftClientSecret - Client Secret you got when you regisered your application on the Microsoft Azure Marketplace
- OSXTTSServerURL - URL of the TTS server
- PluginVersion - plugin version
- ProxyUsed - "proxy is in use" or "proxy is not in use" to indicate if the UPnP event proxy is in use
- RouterIp - router/firewall IP when the Sonos unit can access the Vera only with a port forwarding rule
- RouterPort - router/firewall port when the Sonos unit can access the Vera only with a port forwarding rule
- SonosModel - for plugin internal usage (icon management)
- SonosModelName - model of the Sonos unit, for example "Sonos PLAY:5" or "Sonos CONNECT:AMP"
- SonosOnline - "1" when the Sonos is online or "0" when it is offline
- SonosServicesKeys - for plugin internal usage
urn:upnp-org:serviceId:DeviceProperties
- SonosID - UUID of the Sonos unit
- ZoneName - name of the Sonos unit
urn:upnp-org:serviceId:AVTransport
- AVTransportURI -
- AVTransportURIMetaData -
- CurrentAlbum -
- CurrentAlbumArt -
- CurrentArtist -
- CurrentCrossfadeMode -
- CurrentDetails -
- CurrentMediaDuration -
- CurrentPlayMode -
- CurrentRadio -
- CurrentStatus -
- CurrentTitle -
- CurrentTrack -
- CurrentTrackDuration -
- CurrentTrackMetaData -
- CurrentTrackURI -
- CurrentTransportActions -
- NumberOfTracks -
- RelativeTimePosition
- TransportPlaySpeed - not updated when the UPnP event proxy is used
- TransportState -
- TransportStatus -
urn:upnp-org:serviceId:ContentDirectory
- Favorites - data describing all the Sonos favorites (used by plugin UI)
- FavoritesRadios - data describing all the favorites radio stations (used by plugin UI)
- Queue - data describing the content of the Sonos queue (used by plugin UI)
- SavedQueues - data describing all the Sonos playlists (used by plugin UI)
urn:upnp-org:serviceId:RenderingControl
- Mute - "1" if volume muted or "0" if unmuted
- Volume - general volume, value from 0 to 100
urn:upnp-org:serviceId:ZoneGroupTopology
- ZonePlayerUUIDsInGroup - comma-separated list of UUIDs identifying the group members
- ZoneGroupState - XML data describing the Sonos network and the current state of all groups
Reference
- Main discussion area - http://forum.micasaverde.com/index.php/board,47.0.html
- Example UI5 scene post from @parkerc
Attachments
- D_Sonos1.xml (599 bytes) - added by anker 14 years ago.
- I_Sonos1.xml (5.6 KB) - added by anker 14 years ago.
- S_Sonos1.xml (701 bytes) - added by anker 14 years ago.
- SonosUI5AdvancedScene.jpg (80.8 KB) - added by guessed 13 years ago.
- Sonos-Dashboard.png (23.9 KB) - added by guessed 13 years ago.
- Sonos-Dialog-Control.png (43.0 KB) - added by guessed 13 years ago.
- Sonos-Dialog-Player.png (58.8 KB) - added by guessed 13 years ago.