
Introduction

The Yamaha Receiver Plug-In for Vera allows you to remotely control several receivers models from your Vera dashboard. Your receiver must be connected to your network using an Ethernet-to-serial (RS232) adapter. The plug-in supports around 200 discrete commands and makes various status information items available to Vera (not all commands are exposed in the user interface).
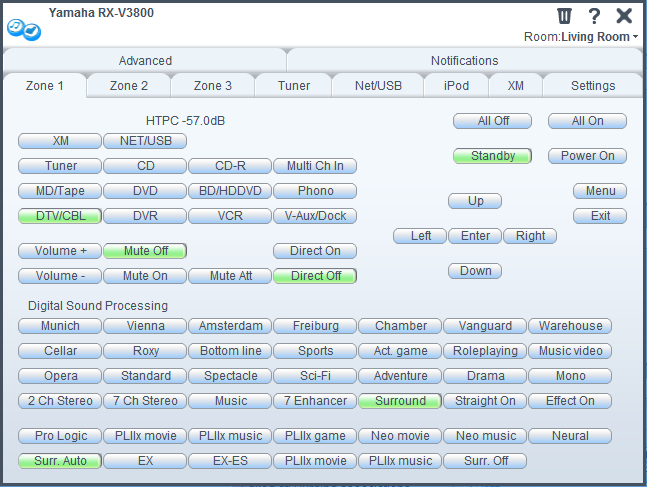
Screenshot

Requirements
- Vera: Vera version 1.0.989 or above (required for stxetx protocol). The plug-in has only been tested on Vera UI4.
- Yamaha RX-V3800
- Yamaha RX-V1800 (untested)
- Yamaha HTR-6190 (untested)
- Ethernet-to-serial adapter, such as the Sena HelloDevice LS100, configured and connected to the receiver.
Possible Compatible Devices
- Other RX-series receivers may also be compatible.
Installation
Upload the Required Files
- Download the latest release, and then unzip the contents to your local machine.
- Open the Vera console, and then click MiOS developers.
- In the MiOS developers window, select the Luup files tab.
- Scroll to the end of the page, click Choose File, and then select a file from the Luup folder.
- Repeat for every file in the Luup folder.
- Check Restart Luup after upload, and then click GO.
- Wait for Vera to load the files.
Add the Receiver
- Click the Create Device tab.
- In the UpnpDevFilename field, type D_YamahaReceiver1.xml.
- In the UpnpImplFilename field, type I_YamahaReceiver1.xml.
- Enter the IP address and port of your Ethernet-to-serial adapter connected to the receiver. Use the format 192.167.0.123:6001 where the port is specified after the colon. If no port is specified, the plugin will attempt to use port 6001.
- Choose the room your receiver is in.
- Click Create device.
Notes
- Thanks go to the people who created the Denon, Onkyo, and Panasonic plug-ins.
Releases
- 06/30/2012: Initial release. http://code.mios.com/trac/mios_yamaha-plugin/downloads/1
Discussion
General discussion about the plug-in is available at: http://forum.micasaverde.com/index.php/topic,11041.0.html
Additional Information
The project source also includes a handy utility that allows you to develop Vera UI panels using any standard HTML development tools. The utility can be found in the util folder, and by executing the exportControls() method in your browser's JavaScript console will output the required JSON object for a Vera UI panel.
By annotating standard HTML input controls you can add Vera-specific options, such as specifying which controls are displayed on the dashboard, which commands should be sent to Vera, and which variables should be used for display purposes. Using this method you can use an HTML editor for positioning and layout of controls in the Vera panel and use HTML files as the source of truth for the Control sections of your static Vera JSON files. The following tables list the supported HTML elements and data attributes.
Supported HTML Elements
| HTML Element | Vera Control |
|---|---|
| input type="button" | Button |
| input type="checkbox" | Checkbox |
| input type="text" | Either a text input field or a variable depending on whether the readonly="readonly" attribute and value is set. |
| span | Label |
Supported HTML Attributes
| HTML Attribute | Description |
|---|---|
| style | Converts the width, height, left, and top CSS styles as entries for in the Display element. |
| value | The text to display when used with input elements. |
| data-control-group | Sets the attribute value as the ControlGroup value. |
| data-display-service | The uPnP service to retrieve a variable from. |
| data-display-variable | The variable to display data from. |
| data-display-value | The initial (variable) value to display. |
| data-command-service | The uPnP service to call. |
| data-command-action | The action to call in the service. |
Examples
The following shows an HTML snippet that creates a static label, a label that displays text from a variable, and two buttons that turn on a device on and off.
<div id="cpanel_content">
   <span style="position:absolute;width:150px; height:20px; left: 10px; top: 5px;">Yamaha RX-V3800</span>
   <input data-control-group="1" data-display-service="urn:yamaha-com:serviceId:Receiver1" data-display-variable="Zone1Message" data-display-value=" " type="text" readonly="readonly" style="position:absolute;width:325px; height:20px; left: 10px; top: 25px;"/>

   <input data-control-group="2" data-command-service="urn:upnp-org:serviceId:SwitchPower1" data-command-action="SetTarget" data-command-parameters='{"Name": "newTargetValue", "Value": "0"}' data-display-service="urn:upnp-org:serviceId:SwitchPower1" type="button" value="All Off" style="position:absolute;width:75px; height:30px; left: 440px; top: 5px;"/>
   <input data-control-group="3" data-command-service="urn:upnp-org:serviceId:SwitchPower1" data-command-action="SetTarget" data-command-parameters='{"Name": "newTargetValue", "Value": "1"}' data-display-service="urn:upnp-org:serviceId:SwitchPower1" type="button" value="All On" style="position:absolute;width:75px; height:30px; left: 535px; top: 5px;"/>
</div>
Author
Created by Tomi Blinnikka. http://www.bliny.net
Attachments
- yamaha_rx_v3800.jpg (4.9 KB) - added by docbliny 13 years ago.
- Screenshot.PNG (50.1 KB) - added by docbliny 13 years ago.