
Last modified 13 years ago
Last modified on 2012-11-28 12:16:32
UI5 Installation and Setup for IT100
IT-100 connected to Vera using an USB-to-RS232 converter
Preliminary Steps
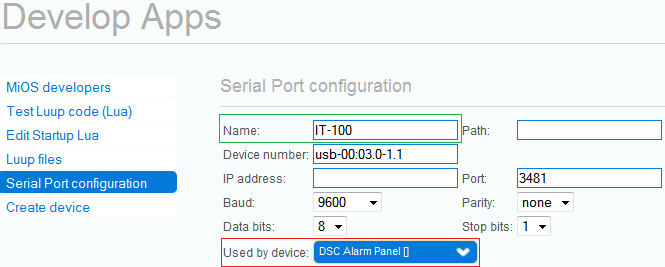
Before attempting to install the plug-in, it is recommended to connect the respective RS-232 adapter, and set this up first in order to establish connectivity. To set up the serial port:
- Open the Vera UI and navigate to Apps >> Develop Apps >> Serial Port Configuration.
- If the serial port is not in the list, restart Luup.
- Set the Baud to 9600.
- Optionally you can rename this port in the Name input box.
- Save.
Plugin Setup
- First go to Apps >> Install Apps and install the plugin.
- After the plugin has been installed go to Apps -> Develop Apps -> Serial port configuration and select the alarm panel device from the Used by device drop-down list.
- Save.
- After Luup has restarted reload the UI.

IT-100 connected to Vera using a WIZnet or Roving Networks IP-to-Serial adapter
Plugin Setup
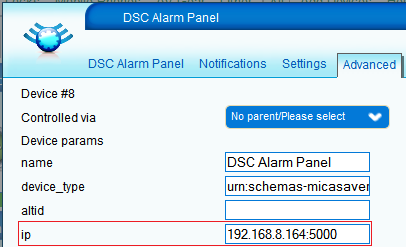
- Open the alarm panel device control panel >> Advanced tab. In the ip input field enter the IP address of the Ethernet adapter and the port on which it is connected. (e.g. if the IP address of the Ethernet adapter is 192.168.8.164 and it is connected on port 5000, the ip value should be 192.168.8.164:5000)
- Save.
- After Luup has restarted reload the UI.

UI5 Installation and Setup for IP170/2DS/3DS
NOTE this should be considered beta only whilst there are still issues to be resolved concerning connectivity.
- Download the plugin from Vera's app store (cp.mios.com user account login required)
- Once the plugin has installed, click the wrench for the newly created device and select 2DS as the interface type.
- * In the advanced tab of the device enter the IP address of the 2DS in the Ip Address field. For the 3DS, you may have to also enter the port, which usually is 4025.
- Reload using (Save)
Attachments
- ui5_ip_config.png (24.9 KB) - added by mcvflorin 14 years ago.
- ui5_serial_port_config.png (21.6 KB) - added by mcvflorin 14 years ago.