
| Version 16 (modified by lolodomo, 13 years ago) (diff) |
|---|
The Sonos Wireless HiFi Music Systems plugin for Vera
This plugin allows you to control your Sonos via Vera scenes.
As I am a newbie in this pls be aware that most parts of the code has been found in other threads. Thanks a lot to many of you in the MCV forum. Be aware that the code is currently in working state - no skills from my side to do it cleaner or better :-)
Thanks a lot to @guessed for his tremendous help dragging me through (and helping out) the process of making my first plugin! Credit goes to him for many changes in structure and good practise doing plugins - thanks!
Development Status
Supported and tested features (no guaranties though):
- Supported Models: ZP80 and ZP100 tested
- Functionality:
- Sonos:
- Mute
- UnMute
- SetVolume
- SetFileToPlay (Places chosen audio file into queue)
- MediaNavigation:
- ChapterDown(Not implemented)
- ChapterUp (Not implemented)
- DiskDown (Not implemented)
- DiskUp (Not implemented)
- FastForward (Not implemented yet)
- Pause
- Play
- QuickSkip (Not implemented)
- Rewind
- SkipDown(implemented as 'Next' on Sonos)
- SkipUp (implemented as 'Previous' on Sonos)
- Slow (Not implemented)
- Stop
- Volume:
- Down (by 3 out of 100)
- Mute (a toggle mute function - currently a poor mans version)
- Up (by 3 out of 100)
- Sonos:
To do list:
- Autodiscovery of Zones
- Autonaming of zone names
- Select source (Playlist, Radio, Services, etc)
- Status on what is playing etc. in GUI
Installation
What you need
- Vera with UI4 has only been tested.
- A Sonos Zone
- The plugin files: use the Zip Archive link at the bottom of this page: http://code.mios.com/trac/mios_sonos-wireless-music-systems/browser/trunk#
How To
- Upload the plugin files:
- In the Toolbox section open MiOS Developers >> Luup Files and upload all the files you downloaded (except the file D_Sonos1_UI4.json and the services subdirectory). check the Restart Luup after upload checkbox and click GO.
- Create the Sonos device:
- Open Create Device.
- In the UpnpDevFilename input box enter D_Sonos1.xml.
- In the Description input box enter a name for the panel device, e.g. Sonos Living Room.
- Click Create device.
- Close this window and Save.
Configuration
- In the Sonos device advanced control tab specify the IP Address of your Sonos Zone
- Now actions are available in scenes
Example Scenes
Creating a Sonos scene under UI5
 To use the Sonos device under UI5, follow the steps outlined below.
- Create New Scene
- Give the scene a name, such as Play Sonos
- Select the [Advanced] option/tab
- Select the Sonos device
- Click (Add)
- Then from the drop down options list created below, Choose SetFileToPlay and enter the full location of the NAS file
e.g. 192.168.1.10/media/Music/Mp3s/Changes.mp3
Now you have selected the file, you need to tell the Sonos to play it
- Select the Sonos device again
- Click (Add)
- Then from the drop down option list created below, Choose 'Play'
- Confirm Changes & (Save)
Now you should have a scene that, once run, will play the track you've selected.
Notes:
- The above bypasses the Sonos queue and will just play the selected track only.
- If you know the length of the track being played you can set a delay to occur
e.g 3.45mins and set another file to play.
Reference
- Example UI5 scene post from @parkerc
Attachments
- D_Sonos1.xml (599 bytes) - added by anker 14 years ago.
- I_Sonos1.xml (5.6 KB) - added by anker 14 years ago.
- S_Sonos1.xml (701 bytes) - added by anker 14 years ago.
- SonosUI5AdvancedScene.jpg (80.8 KB) - added by guessed 13 years ago.
- Sonos-Dashboard.png (23.9 KB) - added by guessed 13 years ago.
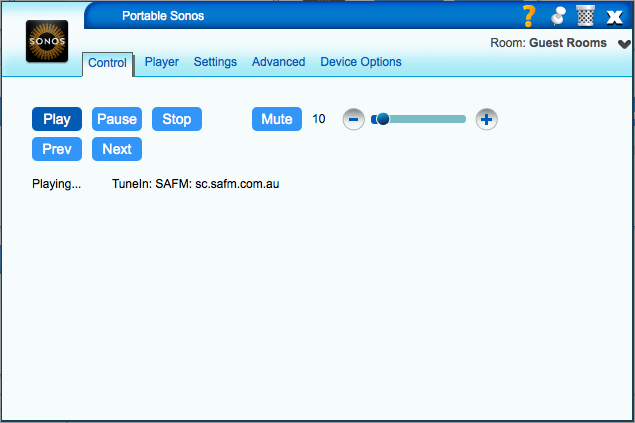
- Sonos-Dialog-Control.png (43.0 KB) - added by guessed 13 years ago.
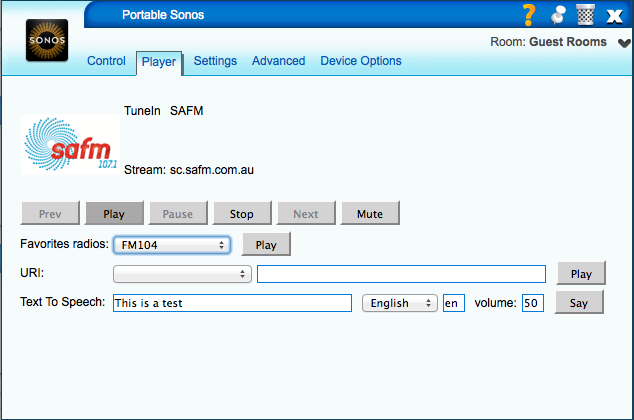
- Sonos-Dialog-Player.png (58.8 KB) - added by guessed 13 years ago.