
Honeywell Ademco Vista Alarm Panels Plugin via AD2USB
Plugin for basic integration with the Honeywell / Ademco Vista panels via the AD2USB keypad emulator.
Compatible Products
All the Honeywell / Ademco Vista alarm panels that AD2USB supports.
NOTE: This plugin uses the GOTO command to switch between partitions when more than one partition is used. If the panel doesn't support this command, the plugin won't work correctly for more than one partition. From what I've seen, the only panels with two or more partitions that don't support this command are the SE panels.
Connecting the panel to Vera
The panel must be connected to Vera using the AD2USB keypad emulator. You will need a Mini USB B to USB A cable to connect the AD2USB to Vera.
Follow the instructions in the AD2USB guide to connect the AD2USB to the alarm panel. Here are some useful links:
- http://www.nutech.com/index.php?option=com_fireboard&Itemid=74&func=view&catid=4&id=13
- http://www.nutech.com/index.php?parent_id=1&option=com_easyfaq&Itemid=84
Installation & Setup
If you haven't already, configure the alarm panel to enable the keypad at the address where the AD2USB is on. e.g. For Vista 20P, if the AD2USB is on address 18, configure the panel to enable Keypad 3 using *191.
Usage
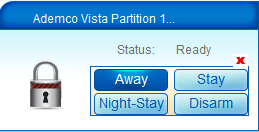
On the dashboard

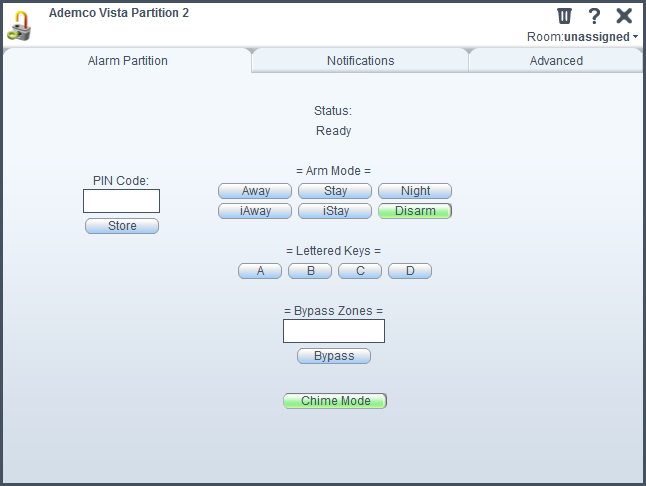
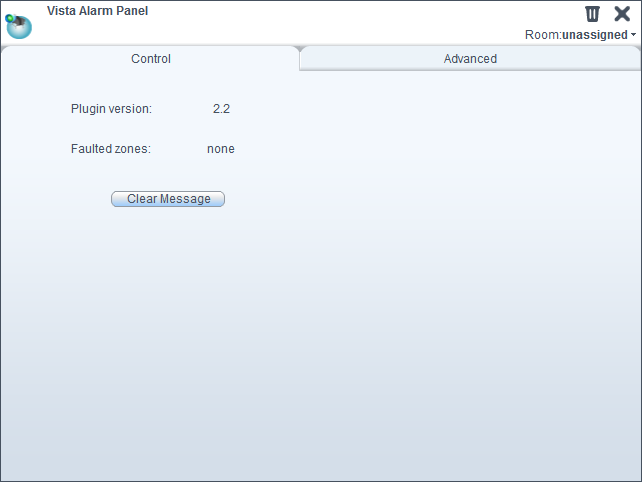
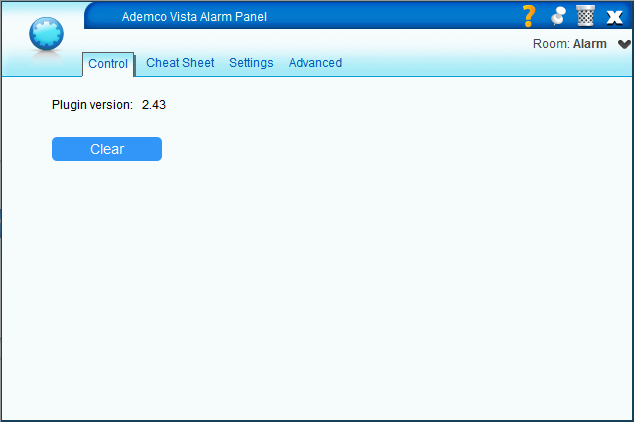
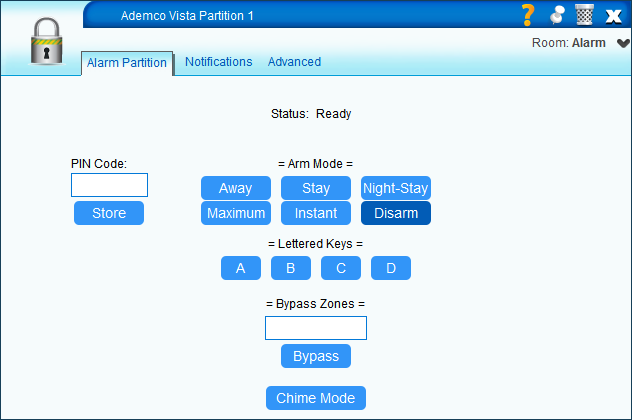
Te panel device displays the plugin version. The partition device displays the current arming status and buttons for the most common arm modes. These are the statuses' real equivalents:
| Displayed status | Real status |
|---|---|
| Ready | DISARMED, READY TO ARM |
| NotReady | DISARMED, with one or more FAULTED zones |
| Armed | AWAY |
| ArmedInstant | MAXIMUM |
| Stay | STAY |
| StayInstant | INSTANT |
| Night | NIGHT-STAY |
The main panel control panel

Clear clears the status messages generated by the plugin in the status box.
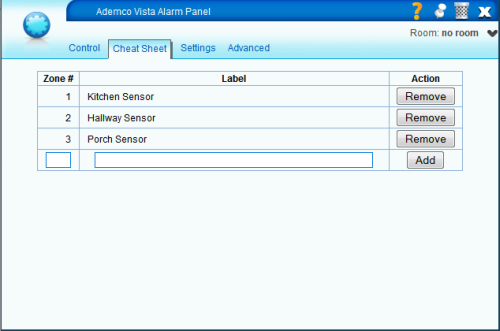
The Cheat Sheet

This is the list of the zones, which must be added manually. The plugin will create a device for every zone in the list. The zones can be used for triggering scenes and sending notifications when they are faulted (tripped).
NOTE: Currently removing a zone from the list won't delete its device. Also deleting a zone device won't remove it from the list.
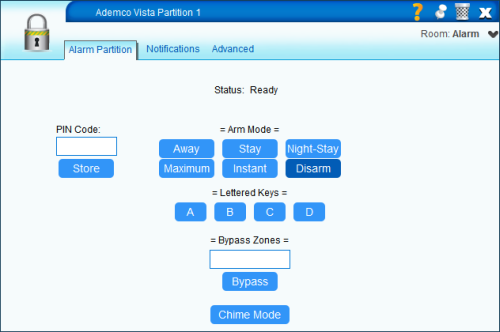
The partition control panel

NOTE: ALL the commands require the PIN code to be present in the PIN Code input field.
Bypass zones
To bypass a zone enter the zone number in the Bypass Zones input box. To bypass several zones, enter the zone numbers separated by a comma. To bypass all the zones leave the box empty or enter all.
Chime Mode
This activates or deactivates chime mode for the current partition. The button will turn green if it's active.
Store
When a partition is in the NotReady state, the plugin will attempt to send the star(*) command to get the faulted zones. If there are two or more active partitions the plugin will use the GOTO command to switch to the partition the command was issued for. This command requires a user code valid for that partition. The plugin stores the user code for every partition in an internal variable to use it ONLY for getting the faulted zones (all the other commands still require the PIN code). If no previous command has been given to this partition, no PIN code will be available, which means that it won't be possible to get the faulted zones. This is what the Store button is for. If you see that a partition is in the NotReady state, but the faulted zones list is empty, enter the PIN code in the PIN code field and store it. After this, you should see the faulted zones list being populated.
Configurable parameters
In the main panel control panel >> Advanced tab there are two configurable parameters.

SecureStore
If this is 0 the PIN code is stored in a file and it can be used for every action, not only to get the faulted zones. This is more convenient but is less secure.
TTL
Quote from NuTech forums:
The alarm panel does not sent out CLEARED messages when a zone is restored. To determine if a zone is clear you have to watch all faulted zones and if one stops reporting as faulted consider it restored. So you have to track the state of the zone messages.
The TTL is the number of seconds a zone hasn't been reported as faulted after which it will be considered RESTORED. This should be set according to the number of zones. It takes few seconds to cycle through 3 zones, but many seconds to cycle through 16 zones. The default value for TTL is 60 seconds.
CheckConnectionTimer
If the plugin doesn't receive any message from the AD2USB after this number of seconds, it sets the ConnectionDown variable to 1. This can be used to set up notifications when the connection with the AD2USB is lost.
DebugMode
By default, the plugin logs only the important events, like the alarms and errors. To enable verbose logging for this plugin set DebugMode to 1, then restart Luup.
How to see the logs:
You can find how to see the logs here:
http://wiki.micasaverde.com/index.php/Logs
It is recommended to look only for the log entries with levels 01 (errors) and 50 (Lua):
tail -f LuaUPnP.log | grep '^01\|^50'
Discussion
Discussion for this Luup plugin is on the MiCasaVerde forum at http://forum.micasaverde.com/index.php?topic=7266.0
Attachments
- dashboard.png (19.5 KB) - added by mcvflorin 14 years ago.
- cp_partition.png (24.6 KB) - added by mcvflorin 14 years ago.
- cp_panel.png (15.9 KB) - added by mcvflorin 14 years ago.
- ui5_panel.png (27.3 KB) - added by mcvflorin 13 years ago.
- ui5_partition.png (32.5 KB) - added by mcvflorin 13 years ago.
- ui5_cheat_sheet.png (32.2 KB) - added by mcvflorin 13 years ago.
- ui5_parameters.png (4.9 KB) - added by mcvflorin 13 years ago.
- ui5_scene.png (15.9 KB) - added by mcvflorin 13 years ago.
- ui5_cheat_sheet500.png (26.5 KB) - added by mcvflorin 13 years ago.
- ui5_dashboard900.png (36.8 KB) - added by mcvflorin 13 years ago.
- ui5_control.png (9.4 KB) - added by mcvflorin 13 years ago.
- ui5_partition500.png (31.3 KB) - added by mcvflorin 13 years ago.